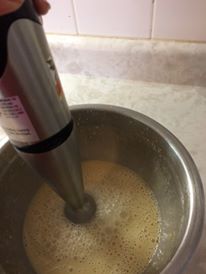
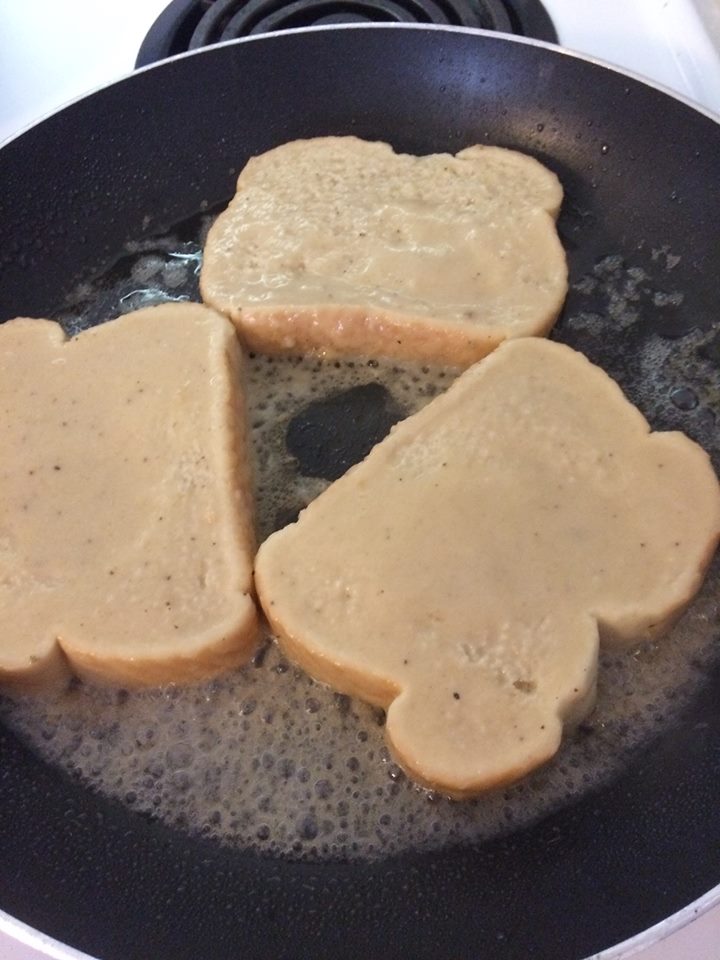
When thinking of something special to make for this celebration of Canada's 150th birthday I came across Vegan Banana French Toast. I would like to thank one of my new Twitter followers, @VegLatino for this week's post. This is a very simple recipe for a favourite breakfast choice of mine. This is nut-free as well. The combination of flavours when plated and eaten are tantalizing!! Ingredients: Bread dip 6 slices day old thickly cut sourdough bread 2 medium bananas 1/4 t Fruit Fresh 1 C non dairy milk substitute 2 T maple syrup 2 T flour 1/2 t vanilla extract 1 t coconut oil 1/4 t nutmeg 1/8 tsp of salt 1/8 t pepper Caramelized bananas 2 ripe bananas 1/2 t Fruit Fresh 1 T coconut oil 2 T coconut sugar 2 T non dairy milk substitute 1/8 t nutmeg Garnish Watermelon cubes with chocolate syrup Process Step 1 Slice bananas and mix in Fruit Fresh. Mash the bananas thoroughly. Step 2 Add to mashed bananas milk substitute, maple syrup, flour, vanilla, coconut oil, nutmeg, salt and pepper. Emulsify until very smooth. Step 3 Prepare caramelized bananas. Heat coconut oil in non-stick saute pan. Add coconut sugar, milk substitute, and nutmeg to heated coconut oil. Take off the heat. Step 4 Slice the bananas for caramelized bananas. Add to heated ingredients in Step 3. Place pan back on heat and cook bananas until they are caramelized stirring infrequently. Step 5 Place bread slices, one at a time, in the Bread Dip mixture until they are soaked. Step 6 Place soaked bread pieces of bread in frying pan. Step 7 Cook until they lift easily to turn over. Finished browning the other side. Step 8 Enjoy!! Daniel Bissonnette from British Columbia Canada shares why children need to eat breakfast before going to school: Did you know: that it takes 40 gallons of maple sap to make 1 gallon of maple syrup? And that there is one way to cut watermelon that eliminates wasting the delicious meat of the fruit? Here's how to do it?
In conclusion: I tried using a cast iron frying pan initially for cooking the toast, however it was impossible to turn them over with their cooked goodness. Also, instead of berries as garnish I used watermelon cubes with chocolate syrup dropped on top. It was supposed to drizzle but did not. :( This was incredibly delicious!! Dear Reader: We have a Saskatchewan Roughrider game today against the Winnipeg BlueBombers. Lots of activities around our Legislative Building before the game and fireworks after the game. What plans do you have for your celebration of your national day?
0 Comments
Influencing Others I think I just might have expanded my sphere of influence concerning vegan cooking to Chelsey Croft. Recently, I saw a post on her blog for Vegan Brownies. Well, I could not open this post fast enough. I was so excited for her and I. I was anxious to hear how her experience to create something vegan turned out. I am so glad that she followed through with her promise to make something. I am glad her sister enjoyed them. I do hope that Chelsey tries her hand at baking something vegan again. :) 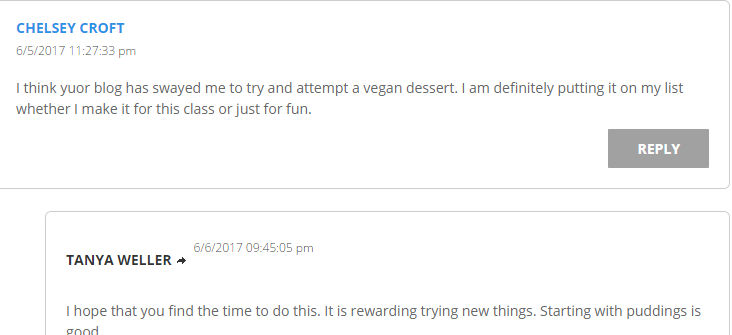
My journey My journey to learn to cook vegan enough to convince others to give it a whirl was not easy. I had been studying and researching veganism for quite some time. It is real easy to go vegan and not really know how to cook anything. I am thankful that I chose this project as it opened my world of knowledge far more than I thought it would. Not only did I learn to cook I was getting practice using the technological skills taught to me through ECMP 355 by creating a blog to document my journey of learning. It was tough coming up with new and different ways to present my topic of the week in an engaging manner. 
-
Struggles I encountered a few struggles along the way. First was choosing appealing recipes that I might enjoy. Ambitious as I am I just had to pick ones that were a little over the top - mozzarella, what was I thinking??? However, you know what it turned out fantastic. Not only did I make my own savoury pizza and the peach pizza with a fellow student, but it found itself between 2 slices of bread and grilled a few times. Not shy of being laid out on top of the peach pizza, the cheese willingly lay prostrate on a couple of more pizzas. Yummy!! Next time though, I will not let it sit in the brine past a week or so. Why, well it seemed to become more waterlogged as the weeks went on. Maybe that is fine for real cheese? However, not this cheese.
Another was trying to find ingredients that were, heretofore, unfamiliar to me. I.e. Agar Agar, xanthum gum, kappa carrageenan, etc. Searching the internet for these sometimes turned up fruitless, i.e. lactic acid. However, I did discover that it is used in the brewing of beer through my searches.
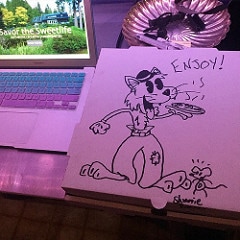
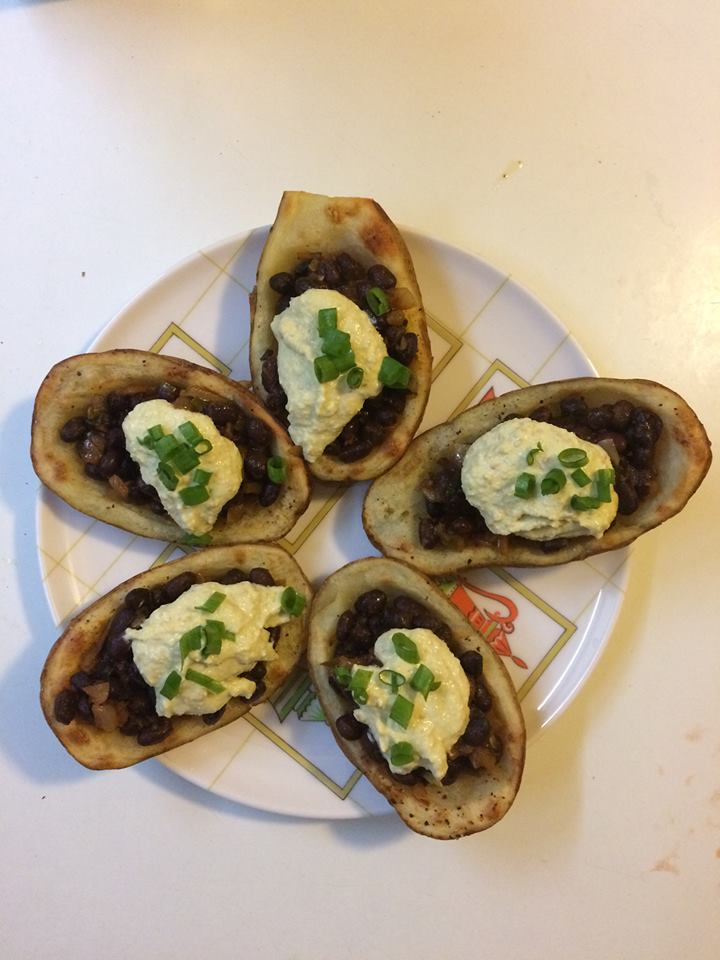
In conclusion It has been a very busy 6/7 weeks. Without this challenge I would have been chained to my very limited repertoire of pasta/sauce, oatmeal, salads, fresh fruit, vegetables, nuts and seeds. Now that I am cooking more my children are glad they do not need to 'feed' mom. Who knew!! I have become more adventurous in trying to cook creative meals outside of my own plain cardboard box. Did you know: that a vegan diet is anything but boring? Check out these menu plans with accompanying recipes. Dear reader: would you be willing to go vegan like Oprah did with her staff of 378 for just one week? Up Next: Vegan Banana French Bread I have been waiting to make this last because the recipe seemed to to be difficult. It does have many steps but the end result is worth it. These freeze beautifully. First freeze individually, including the sour cream, on a cookie sheet. When frozen wrap each in plastic wrap and then put in a large freezer bag. To enjoy just take what you need out and allow to thaw. Remove sour cream and heat the potato and bean mixture together. Then top with the sour cream. So yummy. 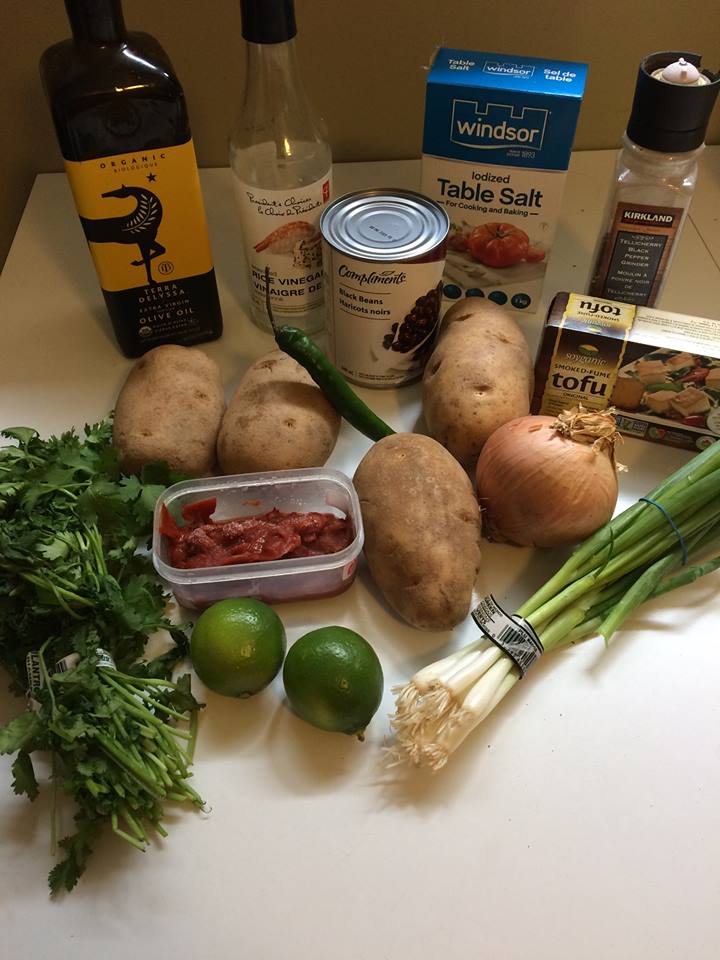 Ancho Chili Black Bean Potato Skins with Cilantro Lime Tofu Sour Cream Ingredients 1/2 lb tofu crumbled (I used smoked firm tofu) 2 limes zest and juice 1 t rice vinegar 1/4 C virgin olive oil 2 scallions sliced thinly pinch of salt ---------------------------------------- 2 small jalapeno peppers sliced very thin and place in 1/3 C hot water (save this water) 1 small onion diced 1/4 C fresh cilantro chopped 2 T olive oil 2 C black beans 1 t dried coriander ---------------------------------------- 4 small Russet potatoes 2 T tomato paste pinch of salt Process Cilantro Tofu Sour Cream Step 1 Place the tofu, oil, lime juice and zest, vinegar and salt in a blender. Blend on high for 60 seconds until smooth. Step 2 Chill for 1 hour before serving. Filling Step 1 Saute minced onion and cilantro leaves in 2 T olive oil for about 3 minutes until translucent. Step 2 Add sliced jalapeno peppers, coriander and tomato paste to the sauted onions for another 3 minutes. Step 3 Add beans and water from soaked peppers to this mixture until the sauce thickens. Add a little salt. Preparing Potatoes Step 1 Preheat oven to 350 degrees F. Wash potatoes and put in a large pot. Cover with water and bring to boil. After water comes to a boil only allow to cook for 5 minutes. Step 2 Drain potatoes and add very cold water to potatoes. Let sit until cool Step 3 Cut each potato in half lengthwise and carefully remove the centers (uncooked part) with a melon baller or sharp spoon. Leave at least 1/4" of the potato next to the skin. Step 4 Drizzle olive oil on the tops and centers of the potatoes, season with salt and pepper and bake for about 15 minutes until golden and thoroughly cooked. Step 5 Once baked fill each hollowed potato with 1/4 C of hot bean mixture. Top with a generous tablespoon of Cilantro Tofu Sour Cream and some sliced scallions. Step 6 Enjoy!! Did you know: that cilantro and parsley are not interchangeable. There is a difference between them, yet, they are equally good dietary choices. Dear Reader: What is your favourite stuffed potato recipe? Next up: Vegan Cooking Lessons Learned In my blog Finding my Vegan Cooking Community I discuss the importance of finding like-minded friends. However, sometimes there is a non-vegan out there that just might want to dabble their taste buds in vegan fare, at least once. Kymber, the brave soul she is, suggested we make a pizza together. Woah, wait, what??? Oh shoot, now I need to clean my house, company is about to come over.  The proposal...  The response... 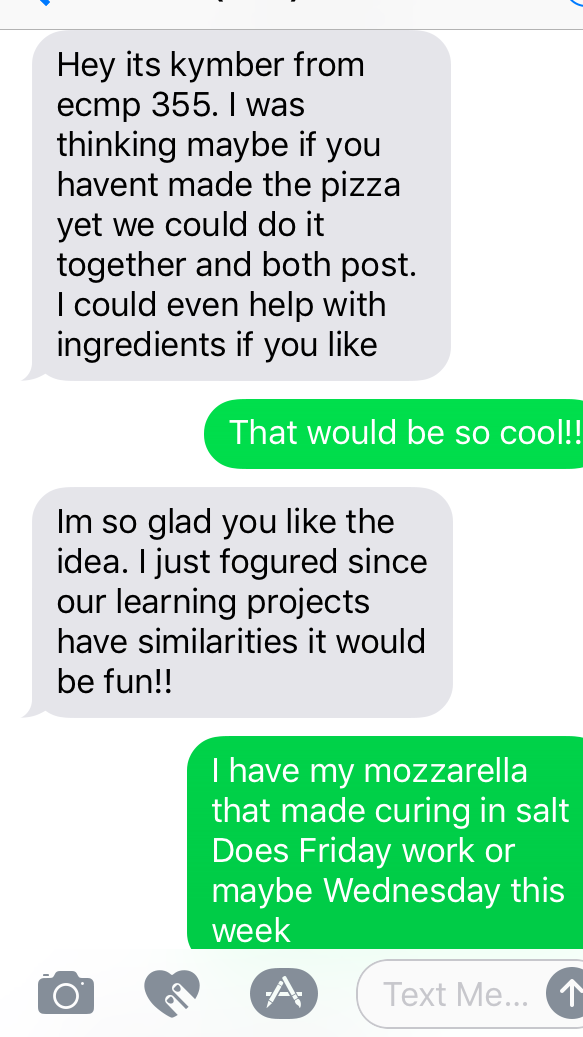 There was a little bit of curiosity, a bit of fearfulness - will my house be presentable enough, and a whole lot of anticipation. I was going to, actually, meet someone from my class who wanted to cook a vegan pizza. This time we are able to use the mozzarella that I made previously. I believe it was about 6:00 pm that we agreed to start our project together. Kymber came to the door and, of course, I let her in. She came with peaches!! It is different meeting someone at your house who you have only seen in a Zoom video a number of times and read their blog a few times. We sort of became familiar with each other through those mediums so the meet and greet was not too awkward, at least not for me. You will need to visit her post on this occasion on her blog. Let's get started... 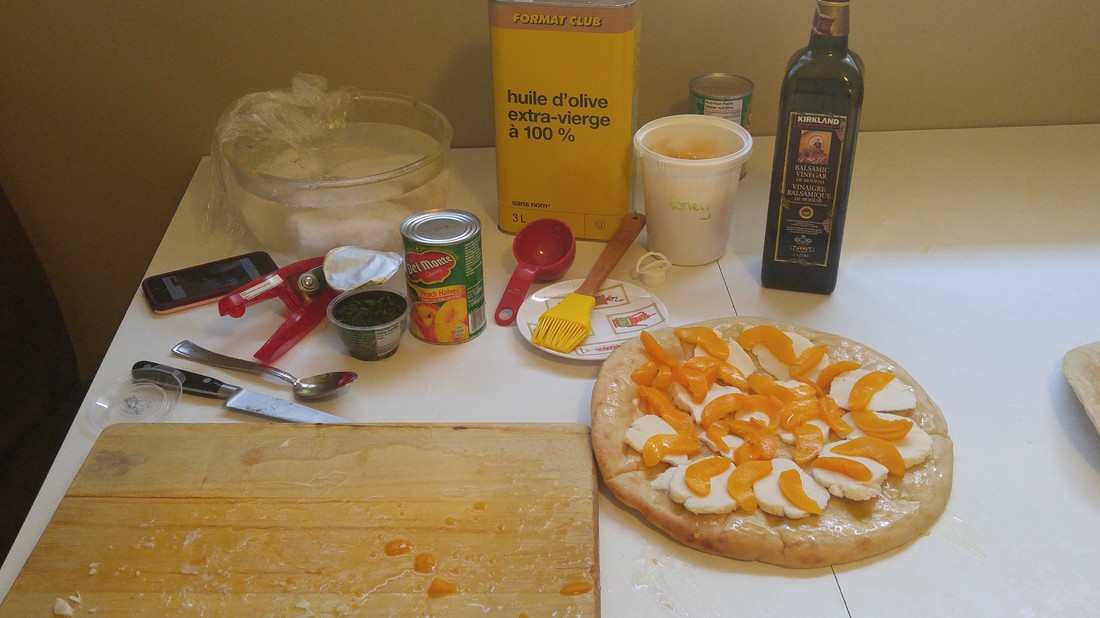 Peach, Basil, Mozzarella Flatbread (2 pizzas) Ingredients 2 pre-prepared pizza crusts 1 can peaches, thinly sliced 1/3 C chopped fresh basil 2 T olive oil 1/2 C balsamic vinegar 2 T honey 8 ounces of sliced vegan mozzarella Process Step 1 Preheat oven to 500 degrees F. Step 2 Pour balsamic vinegar and honey into a deep skillet and reduce to about 1/2 the quantity over medium heat. Step 3 Brush pre-prepared pizza crusts with oil and layer thinly sliced mozzarella on top. Place peach slices over this. Step 4 Bake for 4 - 8 minutes until mozzarella is nicely melted and crust is lightly browned. Remove from oven. Step 5 Sprinkle with chopped basil and drizzle balsamic reduction evenly over top. Step 6 Enjoy!! Did you know: that sometimes it is ok to meet up with strangers, especially students, for the first time. In contrast, meeting up with someone you have very little connection with needs some caution. Dear Reader: Do you have an interest that someone else might share with you? How about taking the leap and getting to know a person you think is interesting? Next up: Ancho Chili Black Bean Potato Skins w/cilantro lime tofu sour cream.
As I was gathering the ingredients together that I had on hand all was good until I needed chickpea flour. Reminiscent of my journey to find lactic acid, my journey took me to a store close to me, then to Sobey's - which has an impressive gathering of all sorts of flours, but, alas, no chickpea flour. I know where to go, I said to myself. The India Food Centre is the best for ethnic food and they had it. Bulk Barn carries it, too. They include the Nutrition Facts for chickpeas.
Besan Chana flour it is called. Not only is it a replacement as a gluten-free flour, but apparently, it does wonders for hair and skin, too. 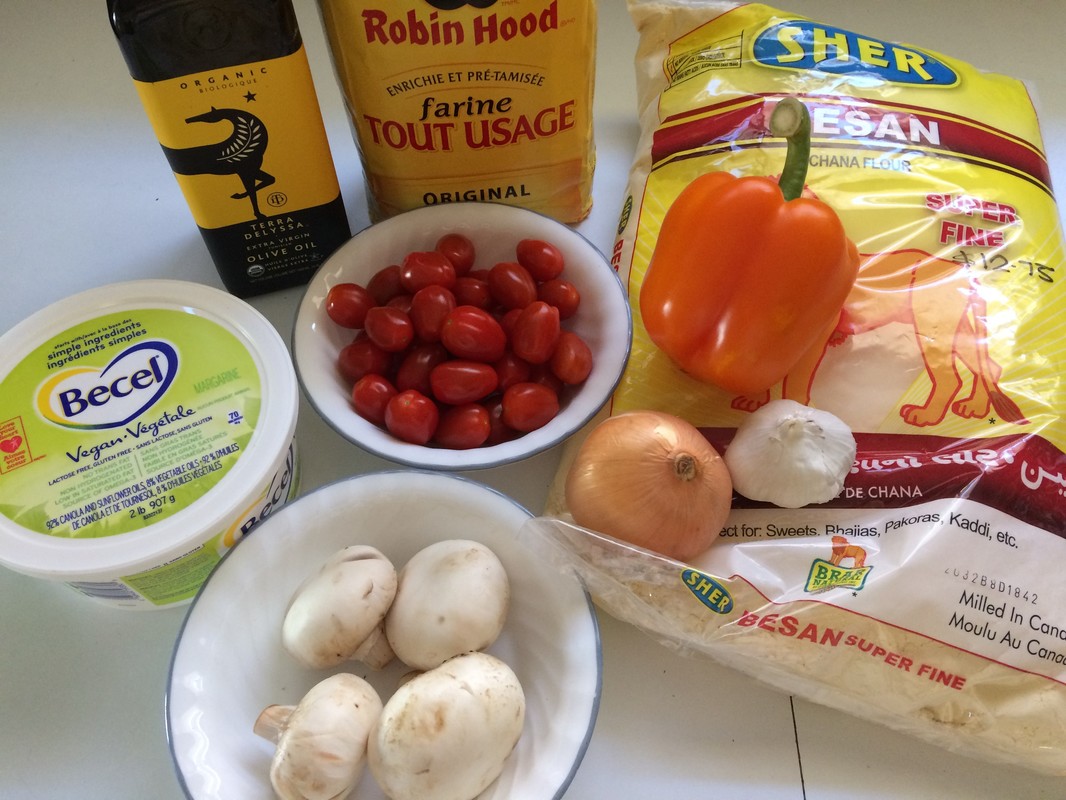
Simple Vegan Quiche Ingredients Crust 1 1/4 C all purpose flour 6 T vegan Becel margarine 1/2 t salt 4 to 6 T ice cold water Filling 2 1/2 C chana flour (chickpea flour) 3 C water 3 T olive oil 2 t sea salt 1/2 t black pepper 1/2 C chopped orange bell pepper 1/2 yellow onion chopped 2/3 C sliced fresh mushrooms 3 minced garlic cloves 1/2 to 3/4 C halved grape tomatoes Process Crust Step 1 In a medium size bowl mix together with a pastry blender flour, salt and Becel vegan margarine. Step 2 Add water and mix gently with back of spoon until dough is gathered together. Step 3 Wrap in plastic food film and refrigerate for 1 to 2 hours. Step 4 Bring dough out of fridge and gently roll out to just over 2" past the edges of the quiche pan. Use a floured rolling pin to roll the dough around to lift onto pan. Then place over top of pan loosely and press into the pan. Use a rolling pin to roll across top of pan to cut off excess dough. Set aside. Filling Step 1 In a medium bowl combine the chana flour with the water, olive oil, salt and pepper with a whisk. Step 2 Add chopped orange bell pepper, yellow onions, mushrooms, and garlic. Mix together well. Step 3 Pour one half of this mixture into the pie crust. Step 4 Place halved grape tomatoes generously on top of pie. Step 5 Bake at 350 degrees for 25 minutes with or without the crust. Great both ways. Step 6 Enjoy!! Note: To merge the three videos I created to show the process of this recipe, I used the video editor in YouTube. To learn how to use it I followed Cherie King's instructions. 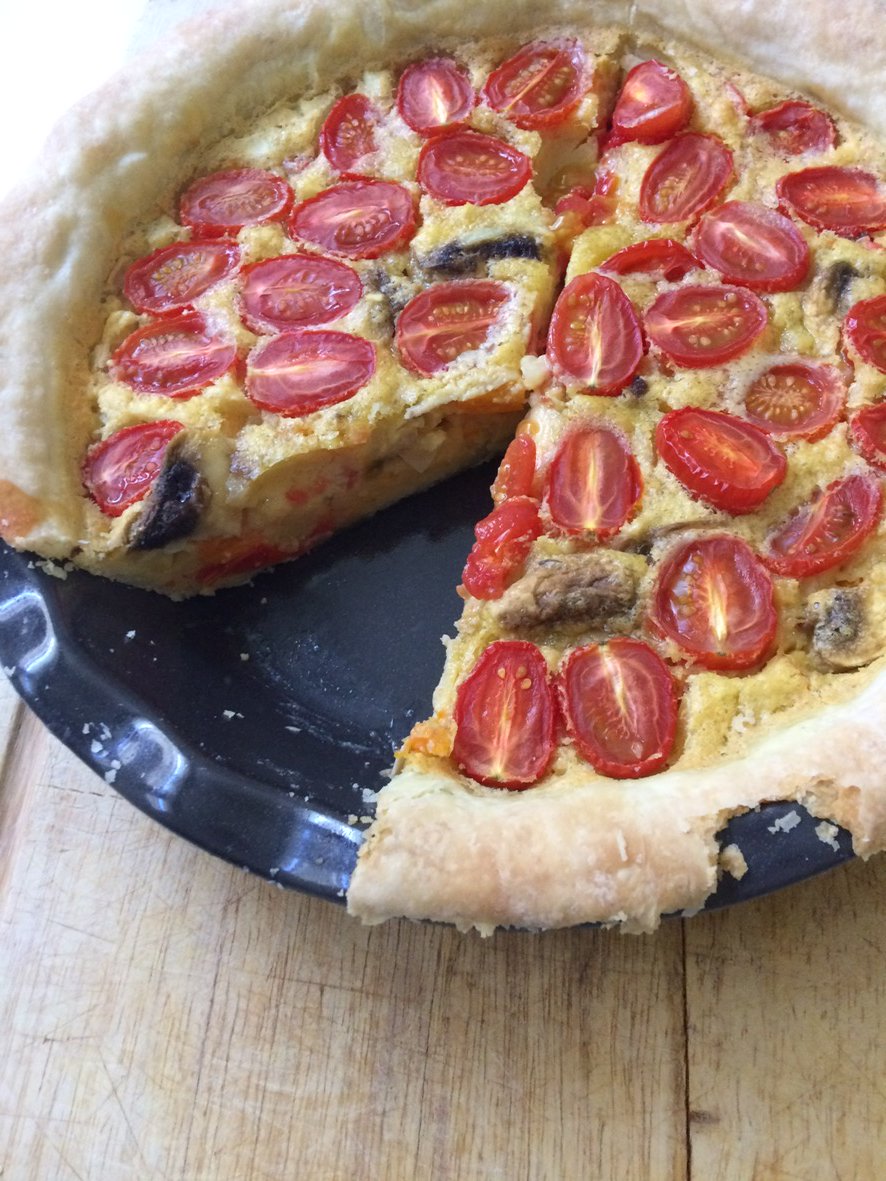
Special Note: I uploaded my single videos that I made to youtube and realized that you can pick your category. The default is comedy. If I was not watching these would have ended up in with Jerry Seinfeld videos. Not of itself a bad thing. :0 In all seriousness these might do better under the education category.
Lonely Egg, I am so sorry, but I needed to leave you behind.

Did you know: that there are many egg replacements. Some examples are VeganEgg; various egg replacers, chia seeds, flax seeds, and even just the yolk vegan style from One Green Planet. In conclusion, I did not add salt to any of the steps. The result was a very bland quiche. However, with salt sprinkled on top, on the bottom, and served with ketchup it was delicious!! Next time I will use salt. Dear Reader: Have you ran out of eggs for some baking project and needed to find a replacement? What did you use? If you are allergic to eggs what do you use as a substitute? Share a recipe? Next up: Cooking with Kymber. Hint - peaches. One of my improvement goals is to connect with vegan cooking communities online. A few that caught my eye on Twitter are @sunnysidehanne, @MyVeganMealPlan , @vegancook101 , @cookingvegan to name a few. While browsing through One Green Planet's advice for new vegans, trying to find community I came across The Post Punk Kitchen Forums. This forum appears very active and current, including discussions covering a variety of life experiences as a vegan. Here are some of their food discussions. 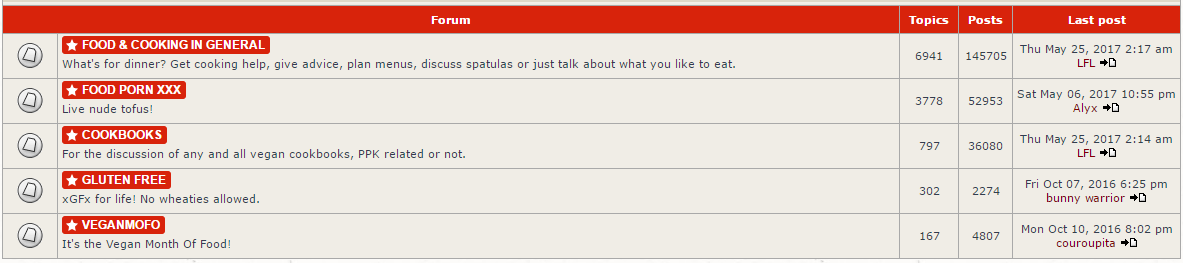 Did you know there is an online vegan magazine called Chickpea Magazine. Although, the magazine is a paid subscription, whether print or online, there is a very good blog on their website. It includes topics such as How We Learned to Cook, Foods We Always Have Prepped, How Learning to Cook Changed My Life, etc. Barefoot Vegan is a free online magazine. The May/June 2017 issue is available her. It's 80 pages are chock full of articles, including a food and cooking section (p. 30 - 32). Doesn't everyone want to peek into someone's cupboard? Of course you do. Come have a look at what is in a vegan's kitchen cupboards.  The hardest part of being vegan they say is meeting others who are vegan. How am I to make vegan friends so that my cooking repertoire can be shared, critiqued and exchanged? In essence, how to meet vegan friends? Well, first you find them online, because it is just a lot easier. :) I searching further, I thought I would ask Google+ how to find communities. There are so many to choose from when I typed in vegan cooking. The ones of particular interest are Indian Food/Cooking Curries, Madame Scientist Cooks, and Vegan Breakfasts. Finally, there are some live chats to follow. A couple of interesting ones are Happy Cow, and @VeganChatRoom. Did you know: that when you see this symbol Ⓥ to the left of someone's name on Twitter it means they are vegan? How cool is that!! In conclusion, through my research I have found not just one but many various and diverse cooking networks. From forums to magazines to meet-ups to Google+ communities to chat rooms I look forward to connecting with others of similar lifestyles and interest. Dear Reader: How has your experience meeting others online who share similar interests worked out? What has been your best experience? Funniest? Next up: "Egg" Pie - yep, you heard right!
This is a response to my mid-term assessment. I am most grateful to my instructor, Katia Hildebrandt, for her time, energy and thought put into evaluating my progress thus far. My audio recording of assessment is below along with my improvement plan.
Note: near the bottom of this post you will find questions addressed to my Dear Reader. 
Here is my Improvement Plan for my Learning Project Blog 1. Continue making great posts. 2. Find online vegan cooking communities to join, especially on Twitter. 3. Find various methods of connecting online with others. 
Dear Reader: Are you vegan? Anyone you know that is vegan? If so, what online vegan community have you found that was most helpful to yourself or others you know? Next up: Finding My Vegan Cooking Community
Did you know that the Egyptians made marshmallows by hand with sap from the marshmallow plant, not gelatin? Yes, there really is a marshmallow plant. Here is a recipe for making marshmallows using marshmallow root for those purists among my readers.

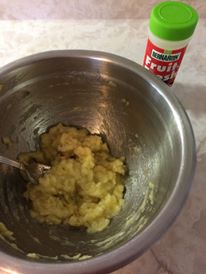
Did you, also, know that you can make marshmallows from the juice from a can of chick peas? This was news to me. I asked my girls what aquafaba was? They cried out in unison the juice from chick peas. If you want to know all the amazing things aquafaba can do look here. Wow!! My daughters have been studying veganism for a long time and I appreciate their efforts to learn and then to teach me.
My first attempt at making marshmallows turned out to be quite an unfortunate event. I switched recipes and found a YouTube video that showed a recipe that worked. I do not have a mixer so this was all done using a whisk. It was not as hard as it was imagined.
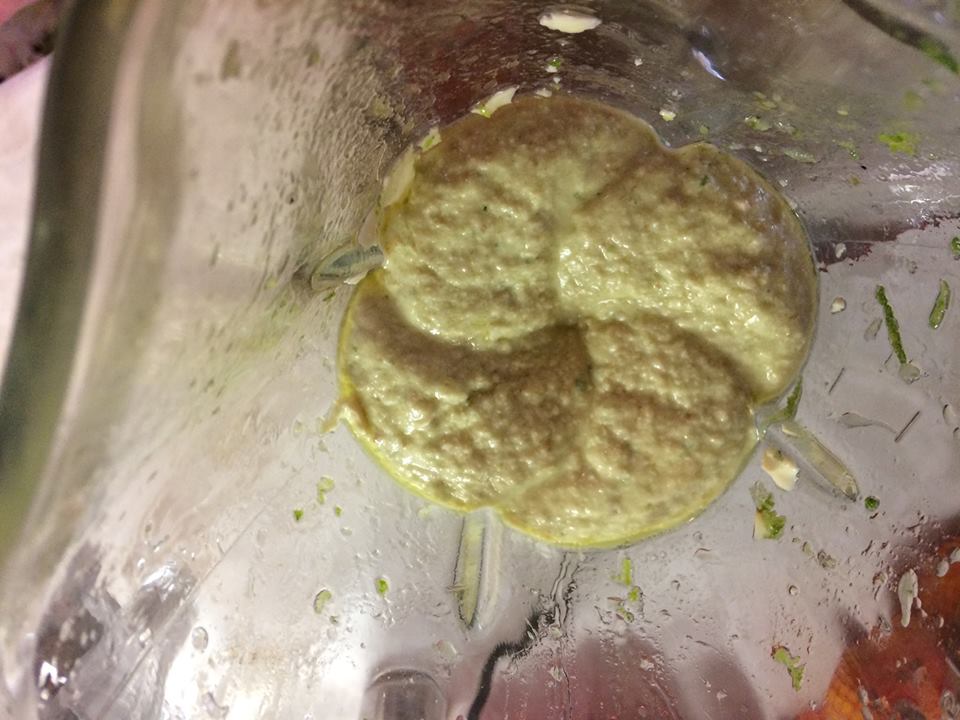
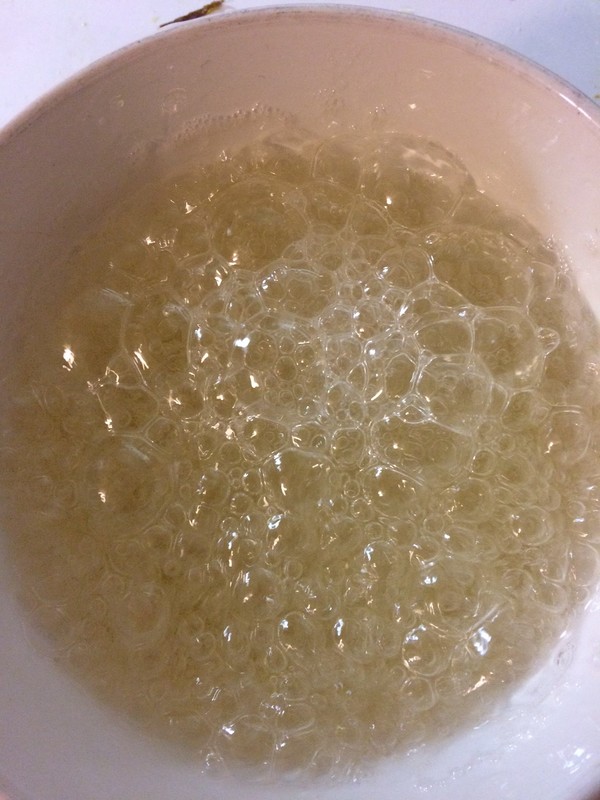
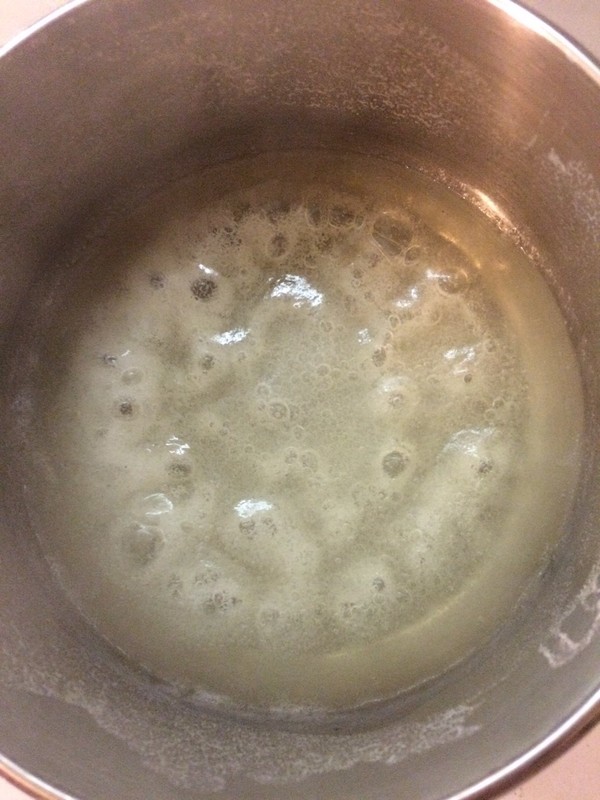
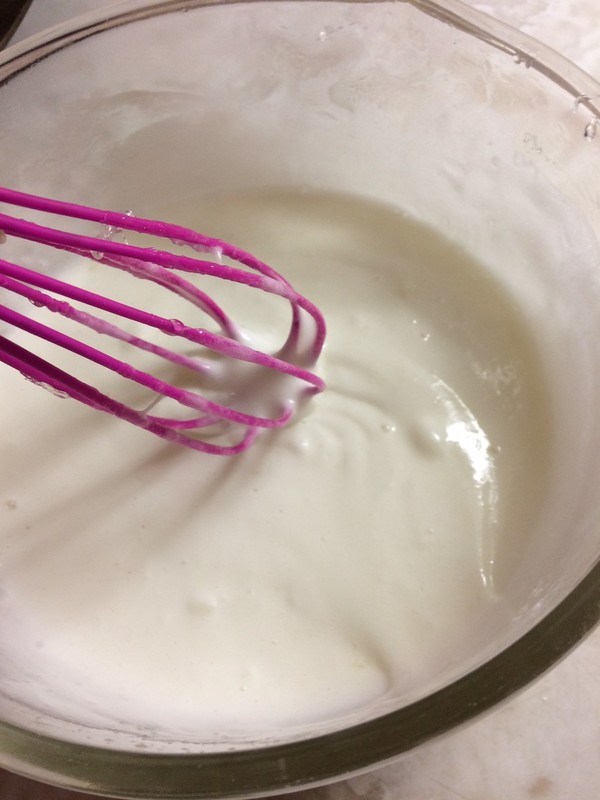
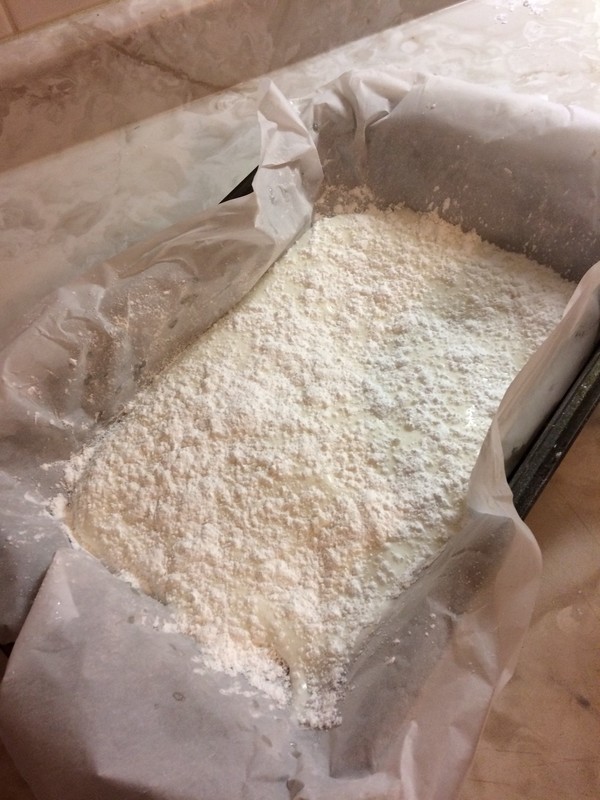
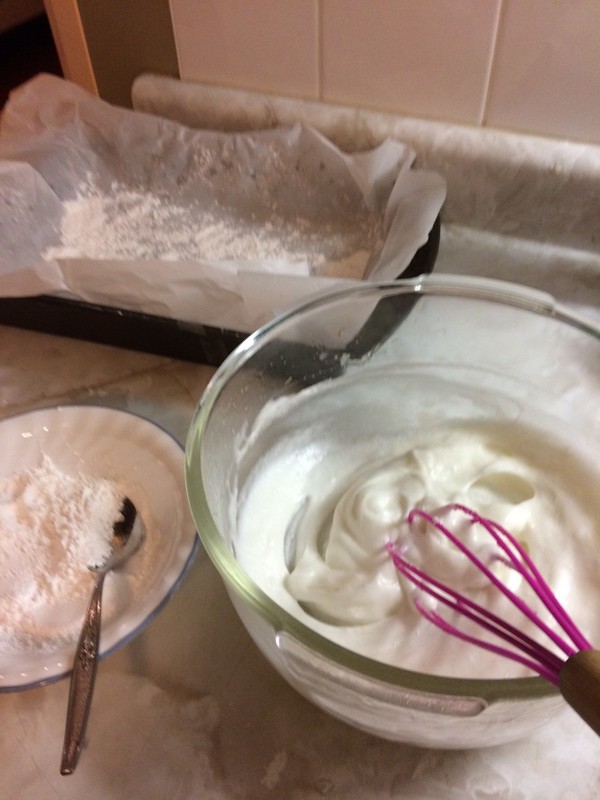
My daughter leaves for her camping trip tomorrow and I promised her that I would make her vegan marshmallows. It is already 10:00 p.m. when I started my second attempt not knowing if it would be profitable. Homemade Vegan Marshmallows Ingredients 1 C sugar 1/2 C white corn syrup 1/2 C water + 1/4 C water 1/2 C aquafaba 2 t agar agar 1/2 t xanthum gum 1/2 lemon or lime juice cornstarch and icing sugar mix for dusting Step 1 In a small saucepan place 1/2 C water and agar agar, stir gently and set aside. Step 2 In large heat-proof bowl mix aquafaba, xanthum gum, and lime or lemon juice. Blend with hand mixer or whisk for just a couple of minutes until the mixtures fills out and sticks to the beaters/whisk. Step 3 Add 1 T of your sugar and beat/whisk until stiff and shiny. Set aside. Step 4 In a second small saucepan put the remainder of the cup of sugar, white corn syrup, and 1/4 C water. Place over high heat until boiling then turn down heat to medium and let cook until the soft ball stage or, if you have a candy thermometer boil until temperature reaches 250 degrees Fahrenheit/120 degrees Celcius. Step 5 Place agar mixture on high heat and turn down to medium once boiling and boil for 1 minute. Remove from heat. Step 6 Slowly add the sugar mixture to the aquafaba mixture while continually beating/whisking. Trust me this does work, even though the sugar mixture is still hot. Beat well for 2 or so more minutes. Step 7 While continually mixing add the agar mixture - this will be more of a challenge because it is more solidified. Get someone to help spoon it in for you. Keep beating until the bowl is no longer warm to the touch. Mixture will form ribbons when the beaters/whisk are lifted. Step 8 Line a small 8" baking sheet with parchment paper (up the sides, too) and dust with cornstarch/icing sugar. Pour marshmallow mixture into pan and smooth the top. Dust the top with cornstarch/icing sugar. Allow to cool overnight. Step 9 Turn onto dusted cutting board and slice with dusted knife. Step 10 Enjoy!! Note Hover over the pictures to see what step is represented. For more details watch the video below. I will be posting videos soon of me making the cheese and the pizza, which is now in the oven. Oh sooo good!!!! It is getting late and I wanted to find a quick pizza crust to make that had good reviews, too. My Favourite Vegan Pizza seemed to fit the criteria. A tweak by jentastic suggested sprinkling italian seasoning on the dough, a suggestion I followed. Pizza dough: 1 1/2 t yeast 1 C water 1 T oil 2 1/2 C white flour (use only 2 C to start) I mixed these all together. Then kneaded for a minute or so. A rolling pin is real handy to spread the dough to the corners of a rectangular cookie sheet. I covered this with plastic wrap and let sit for 15 minutes while I prepped the vegetables. For the pizza toppings I used this site for their recipe. Again great reviews. I am getting so hungry!!! Ingredients for toppings: !/2 each of yellow, orange, green pepper 1/3 of a red onion a generous amount of button mushrooms - I love mushrooms and the buttons were huge. :) some fresh basil they say to use salt but I try to keep it down to a minimum. Italian seasoning for sprinkling on the dough 1/2 - 3/4 C pizza sauce Slice all the vegetables thinly. Set in groups. First the onions were 'roasted' lightly in oil in a frying pan, then the peppers were added, and finally the mushrooms. Saute until all vegetables until lightly roasted. I used a jar of pizza sauce (smart way to save the leftovers) and spread about 1/2 to 3/4 C on the dough. Spread the roasted vegetables on top evenly and top with cut up fresh basil leaves. This smells so delicious!!! Out of the oven was not such a safe place - devoured in minutes. :) Note: I added some salt to the top to help bring out the flavours. It was a bit bland upon the first tasting. That sentiment did not last long. 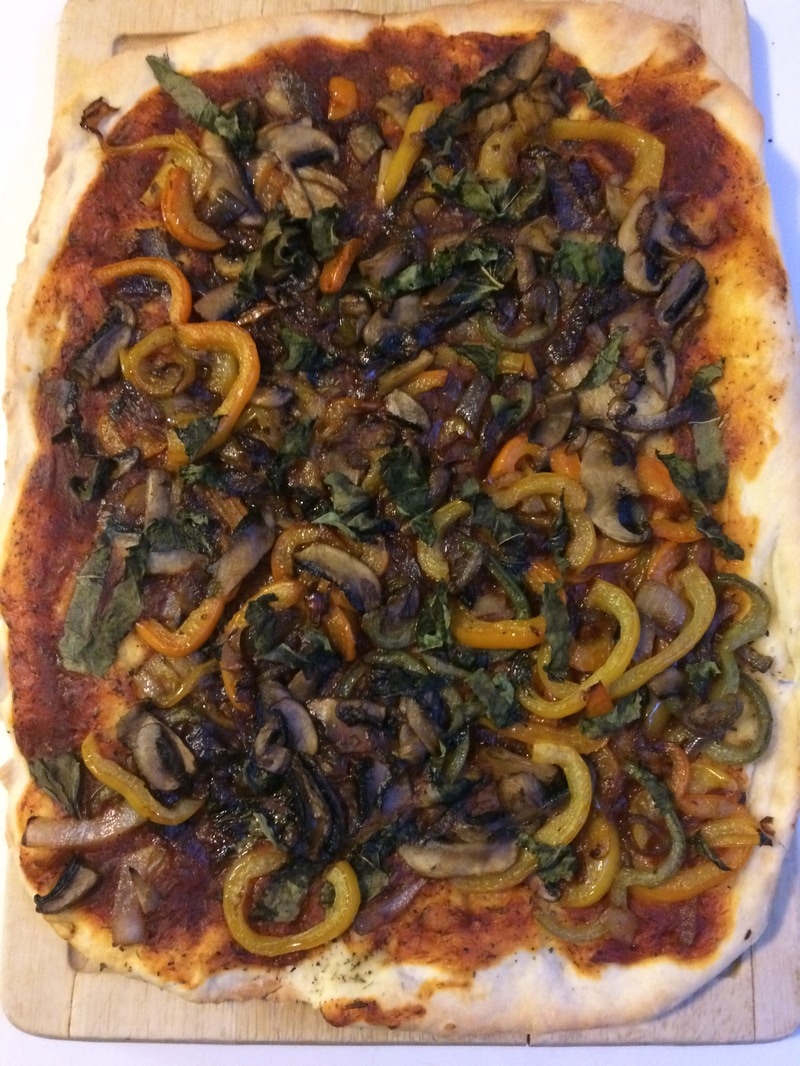 Warning: I realized after watching the video again that the cheese must sit in a brine for 3 - 4 weeks. I will shorten that to 2 weeks for this class. However, I will make the pizza without the cheese because that is good, too. So first we will get the cheese finished and to the brine stage. Then I will make the pizza dough, add the toppings and bake. Now that the cultured cashews have sat on the counter for 24 hours I will make the cheese. If you want to wait until later or another day to make the cheese the culture can be refrigerated for up to 2 weeks. Supplies needed: Immersion blender Large bowl of ice and water Large pot Ice cream scoop Plastic wrap Ingredients: 5 C cultured cashew milk 3 T kappa carrageenan 3/4 t citric acid 1 1/2 C tapioca starch 1 T salt plus lots of salt to make a brine 1 1/2 refined coconut oil I am using a large pot because my blender is not big enough to hold the ingredients that I need to add. First it is necessary to have a large bowl with lots of ice and water with which to place your wrapped cheese balls. I put 5 cups of cultured cashew milk into a pot and add 3 T kappa carrageenan, 3/4 t citric acid, 1 1/2 C tapioca starch and 1 T salt. I immersion blend this until blended evenly. Now I add 1 1/2 C liquified coconut oil to the mix and mix with a spoon until blended. I turn on my heat to medium and use a whisk (slowly) to stir this for a minute or so. I then immersion blend again for a short minute. I use the whisk until the mixture starts to pull away from the pan. Then I use a spoon to stir until the mixture gets nice and glossy. When the cheese mixture gets to this stage I have my ice and water bath ready beside me and my plastic wrap laid out. An ice cream scoop works perfectly for scooping about 3 scoops full of cheese mixture onto the plastic wrap. It is easy to wrap this up. Double wrapping assures a better seal. I have not perfected Jay Astafa's cool technique. Place the wrapped ball in the ice bath as you do them and let sit in the fridge for 4 hours. After 4 hours the cheese balls are ready to be placed in a brine for 3 to 6 weeks. Then eat and enjoy. The link for the brine mentions that you only need to brine for an hour per pound - this might be a mistake. Note: I will use mine in 2 weeks from now to let you know how it tastes. I took the cheese out of it's wrap and we all did a taste test. A general consensus was reached: it smells like cream cheese, has the texture of mozzarella, but tastes a lot like coconut. Oh, but it slices just like mozzarella. I'll bet it cooks like it, too. It was at this point my daughters told me about refined coconut oil where the coconut taste is removed. The Nourished Life explains the differences between virgin coconut oil and it's refined cousin. Not only does refined cooking oil not taste like coconut it cooks at higher temperatures, too. I prided myself on the virgin oils I buy. I need to look into getting comfortable for some refined versions, especially coconut oil. I was going to throw away the whole lot, but the girls stopped me. They said mom we will make grilled cheese sandwiches and stuff. We will use it. Great kids I have!! 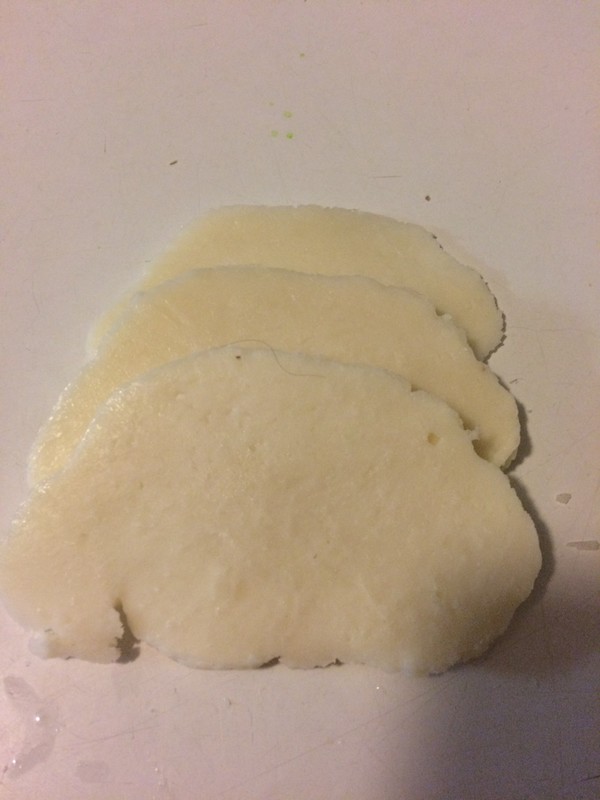 A favourite YouTube vegan sensation that I enjoy watching is Daniel Bissonnette. See his take on trying cashew cheese. :) |
- Home
- About Me
- Blog
- Educational Philosophy
- Inspiration
- Goals
- Resources
-
Professional Knowledge
- Indigenous Studies 100 - Cultural Genocide of Indigenous Peoples and our Responsibility as Teachers for Reparation
- ECS 100 - Ignorance of Inequities is Injurious
- ECS 100 - 3 2 1 timeline
- ECS 100 - Discussion Director Project
- ECS 110 - What is the Grand Narrative - Femininity
- Biology 140 meiosis/mitosis
- PSYC 230 - Psychogenic Needs of a Tudor Royal Family
- PSYC 230 - Multiple Personality Perspectives of Margaret Trudeau
- PSYC 230 - Using Psychoanalytic Theory to Describe the Uses of Defense Mechanisms Defense! Sublimate, Offense?
- PSYC 230 - Block and Block’s Theory of Ego-Control and Ego-Resiliency Summarized
- Sociology 213 Final Exam 3 Parts
- Sociology 213 - Gender Inequality for Those of the Weaker Sex
- Cree 100 Mid-term Exam
- Cree 100 Final Examination
- ECS 100
- ELNG 200
- ECMP 355
- Community Service
- Professional Development
- Favourite Reads
- Awards & Achievements
- Contact
- Social Media
- Non-clickable Page


 RSS Feed
